Views
If you already have a merchant account through which you accept credit cards, you may be able to connect an authorize.net account to it. Call your point of contact for the merchant account to see if this is possible. If not, contact Merchant Bridal Services through which we are able to provide you with an Authorize.net account well below their normal prices. To get started fill out and submit the sign up form: http://efashioncentral.com/admin/efcBMS-AuthorizeNet.pdf
Contents |
Step 1
If you haven't already done so, complete the authorize.net account activation. You should have received a welcome email from Authorize.net with a link to start the activation process. The link should follow the text "Click the secure link below (valid for 60 days) to begin the activation process now. "
See this tutorial video from authorize.net: http://www.authorize.net/videos/?id=1
Or see the PDF guide: http://www.authorize.net/files/accountactivation.pdf
Step 2
Once you have an authorize.net account set up, log into your admin panel at https://account.authorize.net/ Click on "Settings", then click on "Test Mode". Set the account into "LIVE MODE" by turning test mode off. If this is not done first, before the following steps, your transaction key will not work.
Step 3
From the "Settings" page, click on "API Login ID and Transaction Key". Follow the instructions on the page to create a new transaction key. Copy and paste these to a text file as you will need them later. Save your secret questions somewhere safe in case you ever need to regenerate a transaction key.
Step 4 (DO NOT SKIP THIS STEP)
If you skip this step your transactions will fail. From the "Settings" page, click on "MD5-Hash". Enter your API Login ID as the hash value and click submit.
Step 5
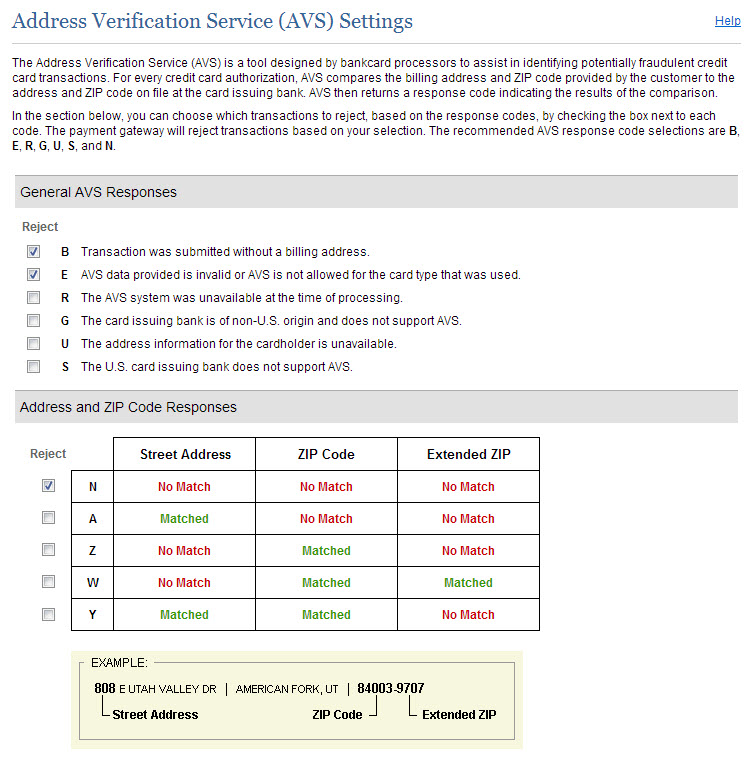
From the "Settings" page, click on "Address Verification Service". Make sure the checkboxes on the page are as shown below, click submit to save.
Step 6
Log into your eSC admin panel at http://estylecentral.com/login.php Click "General Settings", then under Ecommerce Settings click "Click here to edit Payment/Credit Card Settings". Click "Proceed".
Check the box for "Authorize.net (recommended, PCI-Compliant)". Enter your api_login_id and transaction_key from Step 2.
You can set your Authorization Method to either AUTH_ONLY or AUTH_CAPTURE. AUTH_ONLY will check that the customer's card is valid and you will have up to the time allowed by authorize.net to actually process the transaction in your authorize.net admin panel (usually 30 days). AUTH_CAPTURE will immediately process the transaction and draw the funds from the customers card.
Make sure test mode is set to "Off".
Enter any sales tax preferences.
Check off all credit cards you accept (and for which your authorize.net account is enabled).
Click "Submit" at the bottom of the page.
Step 7 (Very Important)
It is very important to place a test order. If you do not place a test order your orders could be failing for months before a customer eventually lets you know! Place a test order using a real credit card. If the order is successful you can void it from within the account.authorize.net admin panel.
Processing a New Order with Authorize.net
1) Confirm that you can ship the item by the customer's wear date; if you are ordering a new one from the vendor ask them to hold it for you.
2) Click the link in the order details to process the payment using Authorize.net. This is what is posted on your Admin Panel as a clickable link: Go to https://account.authorize.net/ to process the credit card. Authorize.net Transaction ID: ___________ This transaction has been approved.
3) Once the payment has processed ask the vendor to ship the item to you or drop ship to the consumer, if you prefer.
4) Update the status accordingly; enter the tracking # once the item is shipped so the consumer can login on your website to see that info.


